Wednesday, December 31, 2014

New 2D Sprite / Model

Recently the automated behavior (AI) for the units in the game has been improved to the point where basic gameplay is possible. At this point I'm ready to tweak and test the automated behavior and needed a new "enemy" to test with.


I created this guy as kind of a raptor-pterosaur hybrid. He doesn't actually fly, but he should look at least somewhat intimidating. For this guy I first sketched a picture to get me a rough idea of what I was going for.

The drawing was done using GIMP, specifically with the Paths Tool. It's not great but it did give me a base for what to model in 3D.


Blender was used for the modeling. The basic process was to start with a cube and keep extracting faces, scaling each end, until I started to get a shape I felt happy with. Next I created a UV skin and painted it with a combination of textures found online and a drawing tablet.


For the picture above I left in the outlines to show how I knew where to "paint" in. As you can see, it mostly consisted of using pre-made textures and some careful blending and paint strokes. Once the model was ready, animations were created (The Animator's Survival Kit was a phenomenal book for helping me to learn animation, even if it is quite old and mostly meant for traditional animation). Finally, with the animations ready, I inserted the model into a blender scene I pre-made for animations, and rendered all the animations to be put into a 2D sprite sheet. I used TexturePacker to combine all the 256x256 renders into a single texture sheet with an accompying JSON file that tells the game where each frame is. I personally like TexturePacker because it does automatic trimming and compression.


It may be hard to see but for some of the animation frames in the sprite sheet, you can see that some of the animations go outside the bounds of the sprite, causing ugly clipping. This is just for the death animation, which I need to fix anyways (it doesn't look that good). In total, this guy has a walk, attack, idle, and death animation (and I may eventually add a casting animation). The end product is the animation you see at the top of the post.

Now that I have a good enemy ready, I can now focus on improving the AI behavior. So far so good!

Friday, December 19, 2014

2D Tile Based Lighting

A demonstration of lighting in the game.

Recently I added lighting to the game and wanted to share a simplified overview of how it was done. Lighting is all done using the CPU and is done on a tile by tile location basis, meaning that the lighting has a certain blocky resolution to it. In the future I may look into adding shader support for lighting, but for now I'll use this until I have time to research into it more.

Lighting is implemented in the game using two variables, the base/ambient light value, and the light value of each unit on the screen. Lighting is implemented in a very fast and simple matter. First, a 2D array is made representing the visible area on the screen (with a resolution the size of each tile). The program loops through every visible unit on the screen, calculates the light emitted from that unit (based on distance from the unit and the unit's light intensity), and if the light calculated is higher than the ambient light, it updates the tile with that higher light value.

Going through the algorithm using pseudo-code,

 LightMap light_map = array[screen_tiles_x][screen_tiles_y];  
 light_map.fill(ambient_light_value);  
 For (unit : visible_units) { // Calculate lighting values for all visible sprites  
         for (coordinate : light_map) { // Go through each visible coordinate on the screen and calculate the lighting based on the distance from the unit  
                 double distance = coordinate - unit.position;  
                 double new_light_value = calculateLightValue(distance);  
                 if (new_light_value > coordinate.light_value) { // Update the light map for any coordinate that has a higher calculated brightness  
                         coordinate.light_value = new_light_value;  
                 }  
         }  
 }  

Then, when drawing all the sprites on the screen (both units and tiles), we adjust the darkness of each sprite based on the light map previous calculated,

 brightness = 255 * light_map[unit_x_position][unit_y_position]; // light_map values range from 0.0 for completely dark, to 1.0 for completely lit  
 color_filter = color(brightness, brightness, brightness);  
 sprite.setColor(color_filter);  

What happens is that for tile locations that are fully lit, the color is unmodified, while for tile locations with a low brightness value, the color is darkened.

An issue with with this lighting method is the limited resolution in brightness, causing this blocky gradient in lighting to occur.

An issue with this method of lighting is that the change in lighting can look very blocky, as you can see a discrete change in lighting from one tile location to the next. Another issue is that this method doesn't support colored lighting, although it should be possible if the lightmap stores color values instead of single floating point values at each location. Of course, this comes at a performance cost.

I've looked up alternative lighting methods, and while I haven't listed them, this is by far the simplest and lowest cost lighting method I could implement. The penalty on performance is negligible due to a few optimizations and the effect still looks relatively good. One thing I need to do now though is implement support for lighting that is blocked by walls. I can do this using collision detection, so that a straight line is drawn at each location calculated to see if a collision with a wall occurs, and only updating the light map at locations where no collisions occur.

Originally this algorithm was designed with parallelization in mind, since it appears to be a good candidate for it. However, to do this requires either mutexes (or atomic variables) on the light map, killing any performance gains from parallelization, or to use seperate light maps that are combined later, which also kills performance due to the heavy memory usage required.

Some optimizations used for calculating lighting include calculating the maximum distance before the light value of the unit goes below ambient light values, and only calculating light values for coordinates within that range. Additionally, if the unit has a light value at or below 0.0, it automatically excludes calculating for that unit.

If anyone has suggestions for a better way to implement the lighting for this game, please send me a message. Currently the lighting has roughly a 13% impact on the performance (frames/second) of the game at 1000 lit units while still appearing respectable, so for now I'm content with it. Time to move on to the user interface!

Note: Special thanks to http://codeformatter.blogspot.com/ for providing a great tool to format the above code.

Sunday, December 14, 2014

New Programming Project


The original game client, written in Dart and ran inside a browser.

A year ago I was researching new programming languages and came across Dart, Google's alternative to Javascript. I gave it a shot and started writing some Dart programs to get a feel for it, and decided to write a simple Diablo clone for it. I used the 2D library StageXL along with Clint Bellanger's sprites used from his game Flare to mock up a simple game where you can run around, teleport, and have skeleton minions.

Due to limitations in performance, I decided to move to C++ with a complete rewrite of the game. The biggest issue I ran into with Dart was that cross-thread communication required only very basic supported types, including numbers and strings. On top of that, it required communication to be done as pass by value. This meant that whenever I wanted one thread to send data to another, I was sending up to megabytes of information at a time.

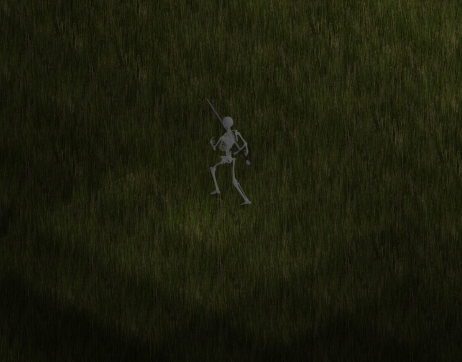
A rewrite of the game in C++ using SDL2.

Although my experience with C++ prior to this project was a only single class at university, I did a lot of reading and my background in C was strong enough to trudge through it in a brute force manner. The above picture shows the results of what I was able to do using C++14, Boost, and SDL2.

The biggest weakness of my project was that it was very much hacked together due to inexperience with the language. I originally used Boost's "any" variable (which can hold any variable dynamically, to be cast to the correct type later) a lot to fill in whatever data I needed. Additionally, I tried way too hard to make everything very generalized; my attempt being to allow for as many possibilities in the future. An example of this was the spell system, which read from a text file and could use any combination of spell effects at varying levels of strength and duration. This made things very complex and hard to keep track of instead of just writing dedicated spell functions.

An early version of the second rewrite in C++, using SFML.

The whole project was a mess because I used it as a platform to learn C++, all with minimal experience. During this time I read several books on C++, including "The C++ Programming Language", "C++ Concurrency in Action: Practical Multithreading", and "Intel Threading Building Blocks: Outfitting C++ for Multi-core Processor Parallelism". Additionally, I studied books on both GIMP and Blender to learn how to create my own media content for the game (all content in the rewrite, including the screenshot above, are self-made). The results in the screenshot above show  a complete rewrite of the game.

Although it still needs some more work (most notably the UI and lighting) to catch up to the old version of the game, it's already apparent how much better the game is performing. A philosophy I learned in the "Intel Threading Building Blocks" book is that when you write a program and expect to use concurrency, you should design the program from the ground up with that in mind. This is a critical design decision that was not made in the old version of the game. Originally, everything was mutex protected for thread safety. This was costly and created a lot of thread blocking; an ugly tack-on that performed poorly. Instead, every variable that has to be accessed by multiple threads now uses an atomic data type; no mutexes are used (aside from whatever is internally used by the atomic and concurrent types defined by the C++11 standard and TBB library). Additionally, using the Threading Building Blocks (TBB) library by Intel, a good portion of the game loop is handled automatically by Intel's thread pool manager. I also used TBB's concurrent containers, specifically the concurrent hash map and concurrent queue for cross thread communication.

Threading Building Block's thread pool kicks in to maximize processor core utilization as demands on the processor increase. In this case, going from handling 10 units (left) on screen to 10,000 (right).


From the images above, it becomes apparent very quickly how effectively the game utilizes all the cores on the system. In the first image, with only 10 units, the demand on the CPU is relatively light and only a few cores are really needed for processing. Once we increase this to 10,000 units being handled simultaneously, the TBB library spreads all that work amongst the 8 threads, greatly improving performance. The beauty of this library is that it will use as many cores as you give it, so theoretically performance should only improve as computers increase in core numbers.

10,000 units filling the screen.

In later posts I'll describe how the actual game is implemented, but for now my next plans are to add lighting and the interface. Also, I plan to go into more detail on the graphics of the game, which were made using Blender, GIMP, and the Python PIL library. It feels good to start posting again on here.