Monday, March 10, 2025

Self hosted Minecraft Bedrock Server in TrueNAS Scale

 We will host a docker container in TrueNAS Scale that runs the minecraft bedrock dedicated server. I apologize for the gap below; I wanted to preserve the original resolution of the pictures to display the text clearly.


First go to the TrueNAS Scale UI, typically located at http://truenas.local/ and click Apps then click "Discover Apps". 

Click "Custom App"


Enter the following in the fields.

For "Node Port", choose the port you want people to use when they connect to your server. For "Host Path", create a folder and choose that as the location to store your database files.

Leave the rest of the fields as default, and click the "Install" button at the bottom. With the above screenshotted configurations, we now have a Minecraft Bedrock server hosted at port 12345. If your truenas scale server's local IP is 192.168.0.5 for example, then you would use 192.168.0.5:12345 as your server address to connect to in Minecraft. You can use port forwarding to expose this to the internet with your public IP instead. If you want to get really fancy, you can buy a domain and have its A record point to your home IP address, that way you can have people connect through myserver.com:12345 instead.


Tuesday, October 26, 2021

How to capture the legendary beasts (Gold/Silver/Crystal)

Recently I started playing Crystal again (a favorite childhood game) and found that no correct guide existed for this, so I decided to write this.

Instructions:

  1. First you need to discover each legendary beast to reveal its location in the pokedex map
    1. Put a level 30 pokemon (such as the shiny Gyarados you might have caught) as your first pokemon.
    2. Fly to Ecruteak City and go down to Route 37.
    3. Use Max Repel and travel in the grass for 5 seconds. To maximize repel, you can change your character's direction without moving by tapping in a new direction. This will trigger wild pokemon discovery without using any repel steps.
    4. Next, go down to Route 36 and travel in the grass for another 5 seconds.
    5. Next, go down to Route 35 and travel in the grass for another 5 seconds.
    6. If no legendary pokemon are found, repeat steps 2 through 6. It's important that you use fly to fully reset their position.
  2. Once you have discovered Raikou/Suicune/Entei, you can take advantage of its movement patterns to find it faster. 
    1. First, prepare a level 55 Jynx with the moves Mean Look and Lovely Kiss as your first pokemon. You also need a high level pokemon with False Swipe, such as Scyther or Marowak.
    2. Fly back to Ecrutek City and go down to Route 37. Check your pokedex for the legendary pokemon's location, if it's in Route 37 go ahead and try to encounter it in the grass, otherwise go to step 3. Do not use repel otherwise you will not see it since Jynx is a higher level. After every 5 encounters, double check the pokedex location, as they will sometimes change location after a random number of battles.
    3. If the pokemon is not located in Route 37, check if it's located in Route 36, 35, 32, or 31, or 33. If the pokemon is in that direction, head towards that route using your bike. Do not fly or you'll reset their position. As you're heading towards the pokemon, be sure to check your pokedex map whenever you enter a new route.
    4. If they are no longer in Router 37/36/35/33/32/31, fly back to Ecrutek City to reset their position, then repeat steps 2 through 4.
    5. Once you encounter the legendary pokemon, use Lovely Kiss to put them to sleep, then use Mean Look. Switch to your False Swipe pokemon and get the enemy down to 1 health before switching back to Jynx. From there just ensure the pokemon is put to sleep whenever it wakes, otherwise throw pokeballs (such as Ultra ball) at it.
Explanations (optional information):
  • Flying is the only way to guarantee randomly resetting their position, entering a building/gatehouse doesn't guarantee this.
  • The legendary beasts follow a pattern. They have a higher chance of moving around a specific area but also a small chance of randomly resetting their position. We try to take advantage of this pattern, which is why we try to discover them quickly with a level 30 pokemon. If you just do the Route 38 trick of leaving and entering the gatehouse repeatedly it will take much longer to trigger their random position reset.
  • Jynx has Lovely Kiss because it has a 75% chance to sleep. She has Mean Look because, while it doesn't guarantee that they don't use Roar, it forces them to use a random move instead of fleeing when they wake. They will sometimes use Roar, sometimes use another move. You need Jynx at around level 55 because she needs to be faster than the beasts (especially Raikou) to get off the Lovely Kiss before the pokemon flees/roars.
  • Be ready to throw 30-50 ultra balls to catch each one. I highly recommend using a master ball on the last beast when you first discover it. Crystal makes this much easier by having Suicune be a regular encounter.

Wednesday, June 3, 2020

How can a fuse have a constant current rating regardless of the voltage of the circuit?

I came across a simple question recently that bugged me because Google didn't seem to have any answers. The best I could come across is people saying "resistance is near 0" and other wrong/irrelevant answers.

The answer is actually quite simple, it's because you can assume the power a fuse fails at is constant and that a fuse has a constant resistance. This is because a fuse is usually just a wire that will melt at a certain temperature. Below is the math to prove it.
  • ConstantPower = Voltage x Current
  • ConstantPower = (Resistance x Current) x Current (using Ohm's law)
  • ConstantPower = Resistance x Current^2
  • ConstantPower = ConstantResistance x Current^2
  • squareroot(ConstantPower/ConstantResistance) = Current
  • Constant = Current
As a reminder, this is true even if the fuse had a very high resistance, as long as the resistance is constant.

Friday, September 28, 2018

The simple purpose of C# 's async & await

Async/Await has one single goal, to write asynchronous callbacks in a way that looks like normal everyday easy to read code.

Here is an example of retrieving a string response asynchronously using callbacks,

Compare this with the awaited version,

While the callback version is reasonably simple, if you continue to add more and more asynchronous calls nested inside each callback, you reach a point called "callback hell" where the code is very hard to track. Let's try where we want to do 3 asynchronous calls, in order, to retrieve 3 website's content.

Now compare this to the awaited version,

Very quickly we see why await can be so much easier for humans to read and understand; it looks like normal sequential code with no callbacks required. There isn't much more to it than this, and for the majority of developers this is all you need to know to get started.

Saturday, November 25, 2017

Government backed blockchain for currency

Bitcoin, and blockchains in general, threaten a government's ability to enact monetary policy. This creates a rift between bitcoin and governments that will likely prevent its universal adoption in its current form. However, we can take the advantages of a blockchain and modify them in a way to create a government sanctioned and controlled blockchain that is still, to a degree, distributed and takes advantage of the efficiency of a digital and secure currency.

A government sanctioned blockchain based currency would need to have the government act as a central authority. What this means is that the government entity would be able to modify the rules of the blockchain to allow it to control the money supply, invalidate/reverse transactions, assign addresses to users, and possibly other ways.

A central authority would have access to private keys that would assert its identity. Using these keys, it could sign certain actions (special transactions) that would be recorded in the blockchain. For example, a government signed transaction could generate coins with no proof of work required (unlike how it is traditionally created through mining blocks). This would allow the government to "print money". Additionally, transactions signed by this authority could remove coins from an address, effectively erasing coins. Also, it could use its authority to possibly grant each citizen an address(es) that it approves of, tying that citizen to an address for tax purposes or other reasons.

Another powerful tool would be the ability to reverse transactions. Addresses of known criminals, or those who owe money to the government, could have their coins forcefully removed/garnished from their addresses. An advantage of this is that if someone was ordered to pay an amount, they could simply send the agreed amount to the recipient's address, proving publicly they paid the debt owed. This would also allow the government the ability to track transactions, monitor fraud/laundering, etc.

Several technical challenges exist with this setup. A single private key owned by the government would be susceptible to a rogue employee effectively destroying the economy if he had access to the key (as it could print money and take money from anyone). Actions signed by the central authority would have to be distributed across multiple agencies, where all agencies would be required to sign the action/transaction before it would be acknowledged and added to the blockchain. Additionally, the government entity would need to be able to revoke and grant keys. Perhaps only require a majority signed for a transaction (to avoid the issue of one lost key preventing the government from being able operate the blockchain).

The government entity would need to provide a significant amount of the mining power for the blockchain. It would need to in order to prevent attacks by foreign governments, and to assert the reliability and secureness of its digital currency. To encourage mining by the public, the government entity could arbitrarily control both the transaction fees and reward for mining a block. Since the govnerment entity provides a large portion of the mining power for the blockchain, it could pick up slack when temporarily lowering block rewards and fees it would accept. The large amount of mining power provided would also allow the government to prioritize government signed transactions. As an alernative, the government entity could require that all blocks mined are securely sent to a government controlled service that inspects the node, signs it, which allows it to be added to the blockchain. This would prevent the 51% attack unless the attacker also had access to the private keys required to sign off in this manner.

An additional advantage of a central authority running a blockchain is that it would adapt very quickly to technical challenges. Things like controlling how often a block is created (to increase verification speed), how large a block is (to control the number of transactions verified in a given time span), control the block reward to control inflation, and even adopting new standards to modify how the blockchain fundamentally operates.

Blockchain based currency is still in its infancy stages and still needs time and heavy research to determine how to be utilized in a way beneficial to a government and its peoples, but the above are possible solutions to this problem that will allow a government to adopt a digital currency in a secure yet controlled manner.

Saturday, November 11, 2017

Bitcoin can't compete with fiat currency

Bitcoin's most important achievement is that it solves the double-spending problem. This allows, on a distributed and decentralized platform with no single authority, for digital credits to be spent in a verifiable and reliable manner. This means that if a transaction occurs using Bitcoin, you can verify that the credits spent only went to the address you specified.

The ability to avoid double-spending without a central authority means that trust is no longer needed to make transactions and assert identity. This allows you to do things such as sending digital credits to someone on the other side of the world without any concern over multiple banks communicating to transfer from one bank account to another and making sure it all occurs successfully. Additionally, blockchains inherently enforce identity by requiring a near impossible-to-break private key that only the owner of the credits has. This key allows the owner to publish transactions on behalf of the address they represent, asserting that they are who they say they are. This means that fraud cannot occur as long as your private key is secure.

While a powerful tool, blockchains suffers drawbacks that prevent it from being used as a mainstream currency. First and most importantly, is that it completely nullifies a country's ability to use monetary policy. This is dangerous as it prevents a government from working to prevent an economy from entering a recession or from overheating. To add to this, bitcoin is deflationary. The supply of Bitcoin is limited and by 2036, 99% of bitcoins that will ever exist will have already been mined. This results in hoarding (and less spending), real debt increasing over time, and a possible deflationary spiral.

Another vulnerability to bitcoin is that it is susceptible to a panic. All it takes is one time, and if bitcoin's price were to ever sharply dip (due to other reasons like adoption of other coins, government sanctions,  etc), it could create a panic where people start to sell en masse to avoid losses until the price went back up. This feedback loop would cause even more to sell until bitcoin were to eventually lose all value. If an economy relied on bitcoin for everyday business, this would cause an economic crisis.

Finally, Bitcoin has the problem of early adopters having a disproportionate amount of bitcoins. The original adopters were earning as much as 50 bitcoins every 10 minutes (worth roughly $360,000 now @ $7200/bitcoin). Large amounts of these bitcoins are tied up in addresses and have not been touched in years, causing uncertainty over the true money supply of bitcoins. The uncertainty of hundreds of thousands of bitcoins possibly flooding the market at any time could create a large disruption in the economy. The founder of bitcoin alone is estimated to have access to roughly 1 million bitcoins, or 5% of the entire bitcoin supply.

While bitcoin has value in being used as a currency, its inflexibility and inability to be controlled by governments will likely prevent it from ever reaching a scale that can compete with fiat currencies. In the same way that gold was banned from ownership and money moved to fiat in the 30s, so too will governments ban blockchains that threaten fiat currency and the government's ability to control the money supply. It is possible however, that governments will adopt a form of blockchain that uses a central authority (similar to IOTA for example) to both allow for a more efficient form of currency while still retaining control over it. Additionally, blockchains will continue to have value outside of monetary uses.

Saturday, February 20, 2016

PokeSynch - Original Pokemon Red/Blue/Yellow with multiplayer features

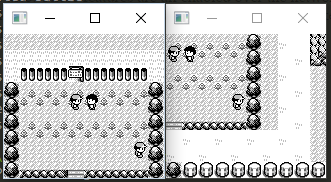
In my free time the past month I've been working on a modification to my GameBoy emulator specific to the original Pokemon games. The basic idea is to create a multiplayer feature for the games, which includes seeing other players walking around in the game, NPCs positions matching across games, and being able to trade also. These features are all enabled over the network, including online, and all run on the original Pokemon ROMs (this is not a new game that looks like the originals). Below is an example of what I have so far,

Two players in a game, where the NPCs are synchronized in their position.
Requesting a battle with the other player
Battle accepted, game on!
When the battle starts, a trainer battle is started.
The trainer is loaded up with your opponent's pokemon.
How it works is that, upon accepting a battle, a trainer battle is initiated on both player's games by changing a few memory values. When this occurs, the trainer's pokemon party is overridden with the remote player's pokemon party. At this point I now need to synchronize battle moves so that each player can make his move. 

For synchronizing remote players, unfortunately the game does not allow more than 16 sprites, so these remote players are "simulated" and drawn over the game's screen each frame. Additionally, if the player tries to walk into the remote player, the emulator will automatically override the memory value for collision detection to make the game think another unit is there.

For synchronizing NPCs, the NPCs are forced to not walk until the host player's NPC walks, then all clients have their NPCs scripted to follow the position of where the host player's NPC walked to. This is done by overriding memory in the game that tells it to keep walking and in which direction to walk.

I still have a ways to go, but at this point you can walk around and see other players and initiate battles.

Sunday, December 20, 2015

Updates on what I'm up to

I haven't been keeping up on my blog lately (or projects in general until recently), but I have a good reason! For the past year and some change I've been working hard on projects and learning as much about development as I can with the intent of finding a development job to start my programming career. After a lot of studying I felt I was ready and started applying around. One of the resources I used, in addition to LinkedIn and job posting sites, was Hired.com.

Hired.com is a recruiting platform that focuses on providing experienced and capable developers, who qualify through Hired's testing and screening process, a recruiter and a large selection of companies to be exposed to. The idea is that after setting up your page and having your recruiter improve it, they open your page for a short duration to hiring companies and actively promote you. Upon finding an interested company, an offer by the company will be made and you begin the interview process with them.

After going through a couple companies, I was matched up with Frontline Technologies that, after interviewing with, gave me an offer and a great opportunity in Chicago. I took it and started working there back in September. So far, I feel very fortunate to have gotten this job. The company has a management approach called "servant leadership", meaning that management exists to support its employees, and the company focuses very hard on the happiness of its employees as a means to increasing productivity. I'm very happy with my job and my co-workers are great; I am very lucky.

While I began working there using .NET and Visual Basic on one of their web applications (SaaS), I was able to be put on a greenfield project implementing web APIs for the backend of a new web app using Web Api 2 (C#) for ASP.NET. So far things are going great, and my team is an amazing group of developers. I have a lot to learn, and thankfully my teammates have been very helpful in that regard.

On the side I've been studying mostly front-end technologies included JavaScript and CSS (and Compass/Sass). I've also been learning MongoDB and Node.js for back-end. Additionally, a few weeks ago I started a new project called RedditBoost, which is a Chome web browser extension that enhances Reddit (with features including hover image/gif preview, user tagging, blocking of users for comments or links, hiding subreddits on the frontpage, and some other features planned).

Overall my skill as a developer has skyrocketed since I started my new job and it's exciting to see how much I can do now. I can't wait to see what I learn and accomplish in the future.

Sunday, December 13, 2015

Tutorial - Creating a Chrome extension with automatic script injection

Recently I started working on a Chrome extension for Reddit (which you can find here), and I hit a bit of a snag as far as getting it started. After some googling and random stack overflow pages, I was able to get going, but for those who just want to skip the homework, below is a quick guide to get you going.

The goal is to setup a Chrome extension that will, on every page, inject and run your JavaScript (which in this case, will make every page's background red).
  1. First, setup a directory and create some empty text files named "onLoad.js", "manifest.json", and "script.js".
  2. The manifest.json file is the configuration for your chrome extension. The following manifest is setup to load your script, "onLoad.js", on all pages. The injected script is "script.js", and it is added to "web_accessible_resources" so that it's allowed to be used. Finally, make sure to use manifest_version 2, which is the latest version (1 is deprecated).

  3. onLoad.js is loaded on every page, but unfortunately it lives in a separate area than the actual page. We want to actually inject, or embed, script right into web page. That way we can directly access elements and have the injected script behave as if it is a native part of the page. We do this by telling onLoad.js to find and insert our JavaScript file right into the current page on every page load.

  4. We're almost done, all that's left is to define our script and load the extension into Chrome. For now we'll do something simple; we will change the background of every page to red.

  5. Finally, lets install and test this extension. Follow the following steps.
    1. In Chrome, go to Settings->Extensions
    2. Check the "Developer mode" checkbox
    3. Click "Load unpacked extension..."
    4. Select your extension's folder and press OK
    5. After you are done testing, to disable, either uncheck the "Enabled" checkbox or click the trash can to permanently remove it
  6. Now that the extension is loaded, go to google.com and see the background change to red. Good job!


Saturday, August 22, 2015

Camping and Website Authentication

Just got back from vacation and had a great time. We traveled up to Traverse City to see my Grandma and cousin; then stopped by Mackinac Island with our bikes to stay the night; then finally arrived at our destination in Tahquamenon Falls to spend the rest of the week camping with my dad, sisters, and brother-in-law.

After getting back home, I finally got around to adding authentication to my website (salgat.net/Manager). While ASP.NET comes with several forms of authentication support built in, I decided to do it the old fashioned way as a quick learning experience. 

Implementing authentication was done using both the Session state and a User SQL table. The table has a UserName, Salt, Hashed (Password+Salt), and Authentication Level stored. When the user goes to the Manager webpage, if they are not authenticated, they are sent to the Login page. In the login page, they submit a username and password, where the username is found in the table, its corresponding salt is found and appended to the provided password, and that value is hashed and compared against the stored hash value. If they both match, the Session collection is updated with the UserName and Authentication level. When the user tries to access any protected pages, the Authentication level stored in Session is checked, and if it fails, the user is redirected to the login page.

Login page located at www.salgat.net/Manager/Login.aspx


The purpose of not storing the raw password in the database is to prevent a database breach from resulting in user's passwords being visible to the hackers, which, while not very helpful for security of your own website, prevents a user's username/password from being used on other websites. The salt is used as a way to prevent rainbow tables from allowing for easy password lookups on the database, since the hacker would have to create unique rainbow tables for each user.

As a final note, it should go without saying that doing any of this is a really bad idea unless you know exactly what you are doing. Security is an extremely serious topic and, unless you are an expert, should not be done in any serious setting. Additionally, any security related programming should be regularly audited by a third party security company/consultant.

Sunday, August 9, 2015

Update to ASP.NET

Last month I updated my website (mostly to present my projects better). The upgrade included using a free template I found online and then manually creating each page in HTML. The result looked alright but it was a pain to change most of the pages. If I wanted to add a new page, I had to update all the pages with the added link in the header. Or, if I wanted to insert a new project, I had to update the project index present at the bottom of all the project pages. Worse yet, it was very easy for one mistake to occur in all the copy and pasting.

I decided to upgrade to an ASP.NET Web App. The first step was finding all the common elements between each page and moving them to a single Master Page. The beauty of this is that if I need to add a new page to the navigation bar, I simply update the Master Page. Additionally, the projects directory has its own Master Page nested inside the main website's Master Page. It programmatically generates the project directory present at the bottom of each project page which makes things so much easier to update.


Finally, I was able to migrate to Microsoft's Azure web hosting platform. Previously, I had been using Dreamhost's VPS and a simple apache server that pointed to a root directory containing my static website. Now, the website is dynamically generated and updating the website is as easy as clicking the "Publish" button in Visual Studio.

As a final note, I decided to have a little fun with the site and added an web site manager page located at http://www.salgat.net/Manager/. It's nothing fancy, but I added a view count tracker using a SQL database that holds a ViewCount entry that is incremented every time a new session is started. I don't actually care much about this (I'm sure most of the views are just web crawlers anyways) but it's a great chance to learn more. I think from here I'm going to add a login for the page and do things like have a table of unique IPs stored with a view count associated with each IP. What's nice is that I'm using the Azure hosting platform again for hosting the database. I was pretty impressed with the pricing, as the combined cost of the web app hosting and database hosting is roughly the same as a VPS with Dreamhost, which means I'll drop Dreamhost's VPS hosting altogether and just use it as a domain provider.

For those who want to check out the progress, I have the project hosted on GitHub. I made sure to use .gitignore for things like Web.config to prevent secure information (database password) from being released.

https://github.com/Salgat/Personal-Website

Monday, July 27, 2015

Entering the .NET world

At this point, I'd say my C++ proficiency is at a point where I can confidently state that I am "decent" at it, and by that I mean I can fumble my way through it! But in all seriousness, I've utilized several different aspects of C++, from parallelism/concurrency, to memory management, to graphical display, and so on, with several years of experience, to where I can say that I feel comfortable using it now. I still very much am a beginner, in that I have so much more to learn, but at least now I can manage to not be completely lost whenever I come across a C++ article or blog post covering an interesting facet of the language.

PreviewLite, a simple image viewer for Windows using C# and Windows Presentation Foundation (WPF).

Over the past month I've been reading up on C# and the .NET framework. Along the way, I wrote a script for the LeagueSharp League of Legends bot and recently started another project. In the above picture, you can see what the program looks like. To use, go to File->Open and select the image you want to see, and then use the buttons to see other images in the folder.

PreviewLite Github: https://github.com/Salgat/PreviewLite

It's a very simple program, but I wanted to start out with something simple to get my feet wet. I don't expect to invest too much time learning Windows Presentation Foundation (it's easy to get into, but with a lot of features if you want to invest the time learning), as my interest lies more in back-end development, specifically ASP.NET. I've been reading Pro C# 5.0 and the .NET 4.5 Framework and am getting close to finishing in the next week or two. The book covers most of what C# has to offer, including the major components of the .NET framework, including ADO.NET and ASP.NET.

From what I've read, I'm really liking the Entity Framework, which provides a way to use objects that seamlessly translate into database entries, to create easy to use and persistent objects in your program. This is in contrast to traditional database APIs that require you to manually define the tables and their entries. I was able to follow a Microsoft tutorial to create a basic ASP.NET based web store that used Entities for its products, and was pleasantly surprised at how simple it is. I'm excited to learn more and have another idea for my next C# project!

P.S. I gave my website a recent face-lift, so check it out! http://www.salgat.net/

Sunday, July 5, 2015

Game Boy Emulator: Project Update

I'm excited to announce two big things! First, the emulator can now play most Game Boy games with minimal issues! Secondly, the emulator is now open source on github! Go check it out at the following link,

Github Repository: https://github.com/Salgat/GameBoyEmulator-GBS


Above are some screenshots of the emulator in action (The Legend of Zelda: Link's Awakening, Pokemon Red, and Super Mario Land 2: 6 Golden Coins). As of now two apparent issues occur: First, upon first starting the game, graphical glitches occur. Second, the timing is off which is most obvious with the scanline, which is out of sync and causes a slight graphical glitch. While the instruction test ROM works fine, the instruction timing ROM fails.


Additionally, even basic interface features are missing. The big issue that was holding me up for the past week was an issue where some games would randomly crash when trying to load a new section of the game. When checking the logger for my emulator and comparing the assembly instructions and memory state against BGB's emulator output, I was finding that the ROM was reading from the wrong memory bank. Unfortunately, nothing in the memory bank controller code looked wrong. I ended up having to log the entire output of the emulator up to the point of the crash, which included the register data, program counter, and some other relevant data, and stepping through BGB's emulator, instruction by instruction, until I could find the discrepancy which took about an hour to do. Eventually, I saw a point where the vertical blanking interrupt vector would trigger and set the wrong memory bank. It was only for a few instructions and not something I expected, but when the LCD is disabled, the current horizontal line stops incrementing. This isn't in any of the documentation I came across, so I'm guessing it's just assumed that you would know this. Unfortunately, I didn't make the assumption but thankfully the problem is now fixed.

While there is still a lot more work to be done (including adding more memory controller support), I'm glad to say that the emulator works on most of the games and works well! It's awesome seeing my favorite games from my childhood running in my own homegrown emulator.

Sunday, June 28, 2015

Game Boy Emulator Update

Tetris running on the emulator, showing the graphical glitch it has with sprites.

On week 3 of this project, and am excited to say that the Game Boy Emulator can now play *some* games! As of now it is only failing for the "HALT" instruction, with all other instructions passing Blargg's CPU instruction tests. Additionally, rendering of the background, window (untested), and sprites are implemented. The above picture shows the one problem with sprite rendering for now: Sprites do not render on the bottom 16 pixels of the screen and worse yet they sometimes render a bit funny. With the current progress of the emulator, you are able to play Tetris, which is pretty awesome considering this is not just my first game that works on the emulator, but was also the first game I received when my Dad gave me my Game Boy over 15 years ago.

Monday, June 22, 2015

New Project: Game Boy Emulator

Game Boy Emulator running a "test rom" which tests instructions to see which work

Over the past week I started one last big project in my spree to test out what I can do these past few months. As seen in the above screenshot, I've been working on a Game Boy emulator! As with my past projects, the only dependency is SFML which I use for rendering (I'm thinking about splitting up the project into two to remove the SFML dependency, since the SFML code is literally a few dozen lines).

The project has been pretty smooth so far and I'm able to run very basic ROMs but am still a ways off from running full fledged games. Probably the most difficult part of setting up the emulator is that you need quite a lot already established to run even the most basic ROMs, and on top of that I had to manually implement over 400 instructions for the modified Z80 processor being emulated, which took 3 days of grunt coding to finish. Thankfully, I was able to use Imran Nazar's jsGB emulator as a base off which I implemented the instructions. Unfortunately, while a good reference, I had to use another reference to go over every instruction and correct mistakes I found, which were quite a few and a bit frustrating (and I'm still not sure I caught all the mistakes).

At least for me, it's almost guaranteed that writing hundreds of instructions will result in some typos and mistakes, which is where test roms come into play. Thankfully, there exists an entire suite of test ROMs that test all the instructions and features of the Game Boy to see if it is compliant. I've been using the BGB emulator's debugger as a base to compare my emulator to. I go through each instruction and make sure they, and the registers, match BGB's.

On GitHub there is a private repository for this project setup, and hopefully in the next few weeks I can make it public. This project really takes me back because the Game Boy is my all time favorite console, and it's really fun to be able to implement my own take on it.

Saturday, June 6, 2015

New Library: SerializeQueue

Recently I completed the first draft of a new header only C++14 library I've been working: "SerializeQueue". The basic idea is that you push all your values onto the queue, serialize it to a binary file, then later load and deserialize the binary file back into a queue to pop data off of.

Github (project page): https://github.com/Salgat/SerializeQueue

This library has been especially fun because I've had a chance to delve into several programming tricks I wasn't familiar with before. The first and most basic is a method for converting a binary value into the specific type to be returned. SerializeQueue supports T pop< T >(), which, using type information, pulls the top information off the binary file and converts it to the type given. To prevent any compiler intervention, the binary is loaded directly into a uint64_t variable and then the following is done,


What this does is it takes the address of the variable, treats it as a pointer, then tells the compiler to treat that pointer as a pointer to a different type before dereferencing it.

The next "trick" I had to use was something called tag-dispatching. The purpose behind tag dispatching is that, for ambiguous cases, you create a way for the compiler to distinguish between two different overloads. Below is an example,

These functions are inline, and the tag itself is just an empty struct, so it ends up being optimized out of the program which eliminates the overhead of the tag. The basic idea behind this, for cases of std::vector, is that a special overload exists that accepts a tag of std::vector among other types specialized for.

The last and current problem I'm working on is implementing tuples. Tuples are difficult because it is a container that holds multiple data types, and requires template metaprogramming to implement. I just started reading Modern C++ Design to try to get a better grasp on this new programming method, but it's definitely a wall that I've hit with what I can do. Hopefully I can come back and flesh out the tuple implementation once I learn more about how to deal with generics. For now this library only supports tuples of basic types.

Tuesday, June 2, 2015

Game Release: BubbleGrow

Main Menu

After a month of development, BubbleGrow is finally ready to be released as open source. BubbleGrow is a simple game whose gameplay revolves around building an army of bubbles to gather resources and fight against other players, with the winner being the last man standing.

Github (project page): https://github.com/Salgat/BubbleGrow
Documentation (wiki): https://github.com/Salgat/BubbleGrow/wiki
Download (64 bit): https://github.com/Salgat/BubbleGrow/raw/master/BubbleGrow-V0.1-Windows-x64.zip

BubbleGrow's only dependency is SFML, which, along with only using the standard library, makes this game cross-platform across Windows, Linux, and OS X.  It's been tested on both 32 and 64 bit platforms with no performance issues (even ran it on an old dual core Pentium from 2007 with embedded graphics). BubbleGrow takes advantage of OpenMP to support multithreading up to as many cores as you can give it (assuming you have up to 1 thread per player, or up to 16 threads for default gameplay). The beauty of OpenMP is that it won't prevent compilation on compilers that do not support it, since it only uses preprocessor pragmas which can be ignored.


Gameplay: Two players battling each other

This game is almost completely licensed under the MIT license, with the only exception being the audio and font, which have their own licensing. The source code is completely open and free to modify, and for anyone who chooses to use the source code, they can do it without any requirements as long as they do not redistribute the source code without the MIT license.

Saturday, May 23, 2015

Enumeration Iterator Library (EnumIt)

In the new game I'm making, I've been using enumerations along with constant arrays for some quick configurations and needed a quicker way to iterate through all available enumerations (for example, when loading images who are identified by their enum class value). I created an enum iterator library (EnumIt) which is a single header file. It comes with functions to get an enum's Begin and End iterator and also provides an interface which supports ranged-based for loops. Although very simple, hopefully it will be helpful to someone else. Below is an example which can be found on the github page: https://github.com/Salgat/Enum-Iterator

 #include <iostream>  
 #include <string>  
   
 #include "enumit.hpp"  
   
 enum class SampleId {  
   FIRST,  
   SECOND,  
   THIRD  
 };  
   
 /*  
 enum SampleId {  
   FIRST,  
   SECOND,  
   THIRD  
 };*/  
   
 int main() {  
   for (auto iter = enumit::Begin<SampleId>(); iter != enumit::End<SampleId>(SampleId::THIRD); ++iter) {  
     SampleId entry = *iter;  
     std::cout << "Current SampleId: " << static_cast<int>(entry) << std::endl;  
   }  
   
   for (auto entry : enumit::Iterate<SampleId>(SampleId::THIRD)) {  
     std::cout << "Current SampleId: " << static_cast<int>(entry) << std::endl;  
   }  
   
   return 0;  
 }  

Tuesday, May 19, 2015

New Project: BubbleGrow

In game screenshot

A couple weeks ago I decided to do one more project before going back to developing my other game. From the above screenshot, you can see a preview of the game, titled "BubbleGrow". The basic idea is that you collect resources (green bubbles), purchase and upgrade your bubbles, travel around the map, and fight other players (such as you (red) fighting the computer (teal) in the above screenshot). The arrow indicators on the edges of the window show where other players are.

The goal for this game isn't so much being fun or for selling, but as a free and open-source project for learning. I've been using GitHub for revision control. I've kept the external dependencies to a minimum (only SFML at this point) and licensed everything (including the artwork I made) under the MIT license, so that anyone can use anything from this project for whatever they wish.

Mock-up main menu (only Quick Match games are currently supported)

The game is structured in a simple manner, is well commented, and is designed to be easy to dive into. To break it down quickly, there exists a "World" class that holds all players, a "Player" class that holds the state of each player, and a "Unit" class that holds the state of each bubble. There is a single subclass ("Resources") that is a specialization of the "Player" class in that it handles those green resource bubbles that the players can mine for purchasing units. The only other class is a "Renderer" class that handles the display and input. I plan to expand the "Renderer" class since it's approaching over 500 lines of code and has way too much scope. A few additional classes are needed to handle sound and batch drawing.

As a learning resource (which is the whole point of making this open source) I hope this project allows people the chance to learn how to download and setup a build environment for a medium sized project. I plan to heavily document instructions for new programmers to be able to build and modify the game. As of now, all that's needed to build BubbleGrow are the library and include files downloaded from the SFML website, CMake, Make.exe, and MinGW.

The different bubble types you can purchase and upgrade to

Additionally, with the way the program is structured, it should be easier for newer programmers to dive right in and start changing things. The entire game state is focused around 3 major functions, "Update" which updates the unit's health and other stats, "MakeDecision", where each unit has a view of the game state and submits a Request for processing, and "ProcessRequest", where the Unit executes either its current action (such as finishing an attack) or starts a new action based on the Request (decision) it just made.

Finally, as a bonus, this game supports multithreading using OpenMP, which is awesome because it is both cross-platform and compiler safe (since OpenMP uses pragma compiler directives which will simply be ignored if not supported) and because this is accomplished without using any threading libraries. While it would have been nice to use a concurrent container from a library like Threading Building Blocks, by following certain rules (such as only calling const methods on containers that don't modify the internal state of the container) and setting only a few variables to atomic, thread-safety is maintained.

Anyways, progress is rapidly underway and I hope to finish it in the next couple weeks. It's certainly a fun personal project and hopefully will be helpful to others!

Saturday, April 25, 2015

Using Python's PIL library to remove "green screen" background.


For some of the sprite sheets used in the game, the renders use a solid background color; these need to be removed to show only the object that was meant to be rendered. An easy way to do this is using Python's image editing library, PIL. Check out the source below.

 from PIL import Image  
 from PIL import ImageFilter  
 import os  
 for filename in os.listdir("."): # parse through file list in the current directory  
      if filename[-3:] == "png":  
           img = Image.open(filename)  
           img = img.convert("RGBA")  
           pixdata = img.load()  
           for y in xrange(img.size[1]):  
                for x in xrange(img.size[0]):  
                     r, g, b, a = img.getpixel((x, y))  
                     if (r < 130) and (g < 60) and (b < 60):  
                          pixdata[x, y] = (255, 255, 255, 0)  
                     #Remove anti-aliasing outline of body.  
                     if r == 0 and g == 0 and b == 0:  
                          pixdata[x, y] = (255, 255, 255, 0)  
           img2 = img.filter(ImageFilter.GaussianBlur(radius=1))  
           img2.save(filename, "PNG")  

The basic idea is to load each frame of the animation, loop through each pixel of each frame, and remove the color of the "green screen" background color, including a small range to account for the semi-transparent pixels on the edge of the rendered object that are mixed with the green screen. Finally, a small blurring filter is added to soften the edges of the image, otherwise at the edge where the green screen is removed, it looks more obvious that it was "cut out". As a final touch, after creating the sprite sheet you can use a program like GIMP to add some additional filters to adjust the color and contrast. You can also use GIMP to get the exact RGBA numbers to specify which color to filter out in your program.